This chapter contains the following topics:
Changing Prices for Groups of Items
Use this selection to do the following:
| • | Change existing prices for an item or group of items. |
| • | Enter prices for an item in a specific warehouse (if you selected to use multi-warehouse pricing in Control information). |
| • | Enter sale or contract prices for an item or group of items. |
| • | Print a list of sale or contract prices for a group of items. |
| • | Print a price list for a group of items. |
| • | Print a price list for a particular customer. |
Refer to the Price Lists chapter for a description of Price Lists.
Inventory Control provides for the following types of prices:
| • | Item default prices |
| • | Warehouse-specific prices |
| • | Sale prices |
| • | Contract prices |
This chapter also explains how to use the Purge sale prices and Purge contract prices selections on the Utility menu. For printing a list of prices, refer to the Price Lists chapter.
Prices may also be controlled by Price codes. See the Introduction to Price codes in the Price Codes chapter.
Item default prices are the prices that exist for an item in Items (Price 1/2/3/4/5 for the stocking unit and for each alternate unit). If you do not enter a price code or set up any other prices for an item, Price-1 for the corresponding selling unit will be used as the default selling price. Price-1 is always used as the default price if the item is sold using the Inventory selection.
If an item has a price code for the selected selling unit, the item's selling price is calculated by applying the price code to the item default prices. Price codes are used only in Order Entry, Accounts Receivable and Point of Sale.
Item default prices can be changed using either the Item prices or Items selection.
Warehouse-specific prices are the prices charged for an item at a particular warehouse. These prices are used in place of item default prices when the item is sold from that warehouse in Accounts Receivable, Order Entry and Point of Sale. If the item has a price code, it is applied to the warehouse-specific prices when calculating the selling price.
Warehouse-specific prices can be entered using Item prices, only if you selected multi-warehouse pricing in Control information.
Sale prices are the prices charged for specific inventory items or groups of items, for a specific period of time. If a sale price is in effect when an invoice is entered in Accounts Receivable or an order is entered in Order Entry, the price used is the lower of the sale price and the price calculated based on item default or warehouse-specific prices.
Sale prices are entered using Sale prices. Six distinct types of sale prices can be defined for the stocking unit and for each alternate unit of an item, as shown below. However, A/R and Order Entry use only the types that are indicated for Use sale prices by in I/C Control information.
When using Point of Sale you have two options, as determined by P/S Control information, for sale prices:
| • | Point of Sale has it's own setup called Special sale prices. It has the advantage of assigning a time of day range for a sale prices; not just a date range. You may also assign an I/C Price code to a special sale price. |
| • | If you need to use alternate unit sale prices you must use the I/C sale price setup. |
If multiple sale prices exist for an item, the type that appears highest on the following list is used by A/R Invoices and Order Entry.
| 1. | Sale price for an item at a specific warehouse |
Warehouse-specific sale prices may be set up only if you selected multi-warehouse pricing in I/C Control information.
| 2. | Sale price for an item at all warehouses |
| 3. | Sale price for a category / sub-category at a specific warehouse |
| 4. | Sale price for a category at a specific warehouse |
| 5. | Sale price for a category / sub-category at all warehouses |
| 6. | Sale price for a category at all warehouses |
Contract prices are the prices charged for specific items or groups of items to specific customers. They may be set up for a specific period of time, or to remain in effect until removed.
If a contract price exists for an item / customer when an invoice is entered in A/R or an order is entered in Order Entry, the contract price is used instead of any automatically calculated price. A contract price can instead be defined to only be active when it is the lowest price.
Contract prices are entered using the Contract prices menu selection. Three distinct types of contract prices can be defined for the stocking unit and for each alternate unit of an item, as shown below. However, A/R and Order Entry use only the types that are indicated for Use contract prices by in Control information.
If multiple contract prices exist for an item, the type that appears highest on the following list is used by A/R and Order Entry:
| 1. | Contract price for a customer for a specific item |
| 2. | Contract price for a customer for a category / sub-category |
| 3. | Contract price for a customer for a category |
Warehouse-specific contract prices cannot be defined.
You may also set up contract prices for Point of Sale. However, Point of Sale has it's own setup for contract prices. You may use that if you wish. However, if you are using alternate unit contract prices you must use the I/C contract price setup. See Point of Sale Control information.
Most of the prices that you define through this selection may be deleted by pressing <F3> when the individual price information is displayed. The only exceptions are the item default prices which would require deleting the item. Sale prices and contract prices may also be deleted by using either Purge sale prices or Purge contract prices.
In addition, if you delete an item using either Items or Purge inactive items, any associated prices for the deleted items are also removed. If the status record for an item is deleted (using Status, Items, or Purge inactive items), warehouse-specific prices for the item in the related warehouse are deleted as well.
Use this selection for changing item default prices. If using multiple warehouses you may enter prices by warehouse.
Select
Item prices from the Prices menu.
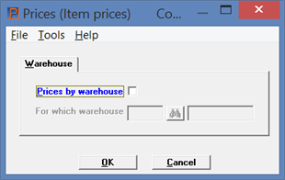
If you are using multi-warehouse pricing (as specified in Control information), you are asked if you wish to enter prices by warehouse. This screen displays:

Check this box if you want to enter prices by warehouse. Otherwise leave it unchecked to enter prices for every warehouse.
If you checked the Prices by warehouse field enter the warehouse for which you are entering prices. This field defaults to the central warehouse (blank).
Select OK to continue or Cancel to return to the menu without entering any prices.
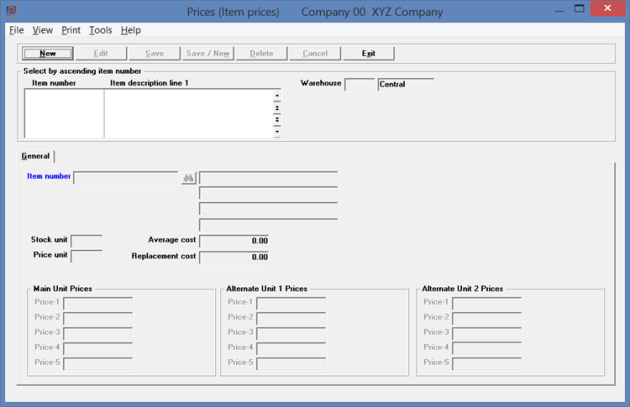
The following screen displays:
Prices for All Warehouses
All items entered are available through the list box for editing. Because of this only the Edit and Exit buttons initially display. After selecting Edit the Save, Save/New, Cancel and Exit buttons become available. Prices for all warehouses cannot be deleted.
Prices for One Warehouse
New prices by warehouse can be entered by selecting the New button. The existing price selected in the list box can be changed by clicking on the Edit button. It can also be removed by selecting the Delete button. After entering a new warehouse price or editing an existing warehouse price select either the Save, Save/New, Cancel and Exit buttons as appropriate.
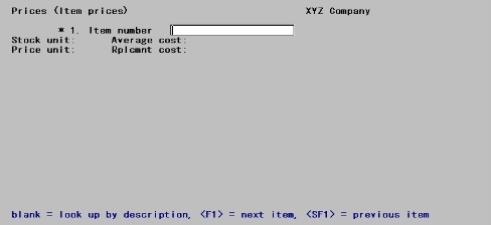
Character Mode
|
Note |
If you selected to enter prices by warehouse, the warehouse you specified is shown at the top of this screen. |
When entering prices for all warehouses, enter the information as follows:
Enter the item number.
If entering prices for all warehouses select the item from the list box.
When using character mode enter the item number when entering prices for all warehouses or one warehouse.
Options
Enter the item number or bar code or use one of the options:
|
<F1> |
For the next item number |
|
<SF1> |
For the previous item number |
|
Blank |
To look up the item by description |
You may use the lookup, by selecting <F8> or clicking on the lookup button, for selecting an item. For instructions on using the item lookup see Item Lookup.
The existing non-zero prices for the item display, along with the item's stocking unit, pricing unit, average cost (standard cost for standard valuation), and replacement cost. If all prices for an item are currently zero, the message displays No prices exist for this item.
In character mode use Field number to change ? to change any of the displayed prices.
Unit Pricing
Price-1, Price-2, Price-3, Price-4 and Price-5
Default prices are entered in Items (Enter). Only prices entered there can be changed.
To enter new prices for an item (for example, if Price-3, 4 and 5 are zero or alternate unit prices do not already exist), use the Items menu selection to enter the prices.
Alternate Unit 1 Pricing
Price-1, Price-2, Price-3, Price-4 and Price-5
Default prices are entered in Items (Enter). Only prices entered there can be changed.
If the item has a pricing unit that is different from its stocking unit, enter the revised prices per pricing unit. The price per stocking unit is then calculated and displayed.
Alternate Unit 2 Pricing
Price-1, Price-2, Price-3, Price-4 and Price-5
Default prices are entered in Items (Enter). Only prices entered there can be changed.
If you are entering prices for a specific warehouse, at Item number, enter the item number.
After the item is specified, enter each price to be used at that warehouse or press <Enter> for the current price in the Items (Item default).
If you press <Enter>, Item default displays as the price. The price in Items (Enter) will be used when the item is sold from this warehouse.
Use the Sale prices selection to enter sale prices and dates for inventory items or groups of items.
When entering A/R invoices, O/E orders or P/S transactions, if a sale price is in effect for an item, the lower of the sale price and the automatically calculated price will be used as the default for the item.
Sale prices that have expired may be cleared one at a rime using this selection, or the Purge sales prices selection on the Utility menu. Refer to Purging Sale Prices.
Select
Sale prices from the Prices menu.
If you are using multi-warehouse pricing (as specified in I/C Control information), you are asked if you wish to enter sale prices by warehouse. Otherwise this screen is skipped and you will be asked for the Sale type.
Check this box if you want to enter prices by warehouse. Otherwise leave it unchecked and you will enter a sales price for all warehouses.
If you check this box for the Prices by warehouse field you will be asked for the specific warehouse.
Select OK to continue or Cancel to return to the menu without entering any sale prices.
On the next screen that appears, you are asked to enter the following information:
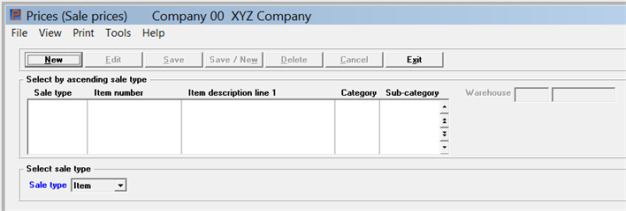
New sale prices can be entered by selecting the New button. An existing price selected in the list box can be changed by clicking on the Edit button. It can also be removed by selecting the Delete button. After entering a sales price or editing an existing sales price select either the Save, Save/New, Cancel and Exit buttons as appropriate.
Select Item (I) to enter a sale price for a specific item, or select Category (C) to enter a sale price for a category or sub-category of items.
Using graphical mode, if you selected Item and hit the Enter key, the By item tab is available for entry. If you selected Category and hit the Enter key, the By category tab displays and is available for entry.
Options
You may also use one of the options:
|
<F1> |
To scan through the sale prices |
|
<SF1> |
Graphical only. To scan through previous sale prices |
|
<Enter> |
After entering the first sale price, to default to the last sale type entered |
|
Format |
Graphical: Drop down list choices of Item or Category Character: One letter, either I or C |
|
Example |
Type I |
If you select Item (I), and did not select to use this type of sale price in Control information, a message displays to inform you that sale prices by item are not active.
if you select Category using graphical mode, and did not select to use either sale prices by category or sub-category in I/C Control information, the Category will not be available on the drop down list.
Using character mode, if you enter C, and did not select to use either sale prices by category or sub-category in I/C Control information, a message displays to inform you of this.
If you specify a Sale type of Item, the following screen displays:
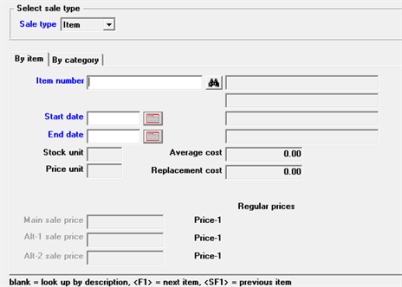
Character Mode
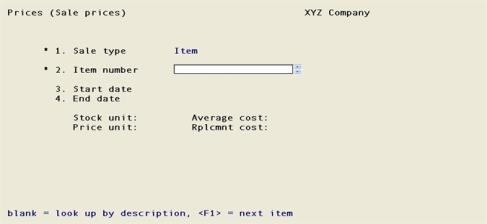
Enter the information as follows:
Options
Enter the item number or bar code, or use one of the options:
|
<F1> |
For the next item |
|
<SF1> |
For the previous item |
|
Blank |
To look up the item by description |
You may use the lookup, by selecting <F8> or clicking on the lookup button, for selecting an item. For instructions on using the item lookup see Item Lookup.
The item's stocking unit, pricing unit, average cost (standard cost for standard valuation), and replacement cost are displayed, along with its current regular price. If alternate units are defined for the item, the current alternate unit prices are also displayed.
Enter the date that the sale price becomes effective. After entering the first sale price, you may also press <Enter> to use the last sale price start date entered.
|
Format |
MMDDYY |
|
Format |
MMDDYY |
Enter the last date that the sale price will be in effect. After entering the first sale price, you may also press <Enter> to use the last sale price end date entered.
Stock unit
Price Unit
The above fields will be filled automatically with the information selected in Control information.
The unit of measure may not be EACH. The first word of the field name will change according to the unit of measure entered for the item.
Enter the price that will be used as sale price.
|
Format |
Up to ten digits |
This field can only be entered if an alternate 1 price was entered for this item. The first word of field name will change according the unit of measure entered, if used.
Enter the alternate 1 price that will be used as sale price.
|
Format |
Up to ten digits |
This field can only be entered if an alternate 2 price was entered for this item. The first word of field name will change according the unit of measure, if used.
Enter the alternate 2 price that will be used as sale price.
|
Format |
Up to ten digits |
If you specify a Sale type of Category, the following screen displays:
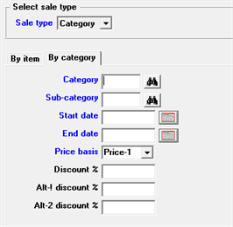
Character Mode
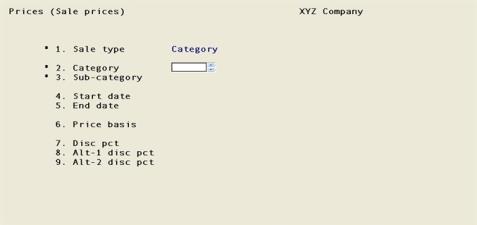
Enter the following information:
Enter the category of the items to be included in the sale price as defined in Control information.
|
Format |
Up to five characters |
|
Example |
Type MISC |
Enter the sub-category of the items to be included in the sale price, or press <F5> for All sub-categories of the category.
|
Format |
Up to five characters or use the option |
|
Example |
Press <F5> |
An entry of All is considered a category sale price because it includes the entire category. An entry of a specific sub-category is considered a sub-category sale price.
If you enter a sub-category of All, and did not select to use sale prices by category (in Control information), a message displays to inform you that category sale prices are not active.
If you enter a specific sub-category, and did not select to use sale prices by sub-category (in Control information), a message displays to inform you that sub-category sale prices are not active.
Enter the date that the sale price becomes effective. After entering the first sale price, you may also press <Enter> to use the last sale price start date entered.
|
Format |
MMDDYY |
|
Example |
Enter the current date |
Enter the last date that the sale price will be in effect. After entering the first sale price, you may also press <Enter> to use the last sale price end date entered.
|
Format |
MMDDYY |
|
Example |
Enter the current date |
Specify the price to be used as a base for discounting.
Options
Enter one of the following:
|
1 |
Price-1 |
To calculate the sale price by discounting Price-1 |
|
2 |
Price-2 |
For Price-2 |
|
3 |
Price-3 |
For Price-3 |
|
4 |
Price-4 |
For Price-4 |
|
5 |
Price-5 |
For Price-5 |
After entering the first sale price, you may also press <Enter> to use the last price basis entered.
|
Format |
Graphical: Select an option from the drop down list Character: One digit from above |
|
Example |
Press 1 |
Enter the percent by which to discount the price specified for Price basis when the item is sold by its stocking unit, or press <Enter> to indicate that the stocking unit price is not on sale.
|
Format |
Up to five digits |
|
Example |
Enter 4.50 |
Enter the percentage by which to discount the price specified for Price basis when the item is sold by its first alternate unit. You may also press <Enter> to indicate that the first alternate unit price is not on sale.
|
Format |
Up to five digits |
|
Example |
Press <Enter> |
Enter the percentage by which to discount the price specified for Price basis when the item is sold by its second alternate unit. You may also press <Enter> to indicate that the second alternate unit price is not on sale.
|
Format |
Up to five digits |
|
Example |
Press <Enter> |
Use this selection to enter contract prices for items, or groups of items, for specific customers.
When entering an Accounts Receivable invoice , Order Entry order or Point of Sale transaction, if a contract price is in effect for an item / customer, the contract price is used instead of the automatically calculated price. A contract price can instead be defined to only be active when it is the lowest price. Point of Sale also has its own Contract prices setup as well. You have the option of using this setup or the one in Point of Sale.P
Contract prices may be entered by item, by category, or by sub-category, regardless of the types selected in Control information. Contract prices may be entered by item, by category, or by sub-category, depending on the types selected in I/C Control information.
If multiple contract prices exist for an item, the type which appears highest on the following list is used by Accounts Receivable, Order Entry and Point of Sale:
| 1. | Contract price for a customer for a specific item |
| 2. | Contract price for a customer for a category / sub-category |
| 3. | Contract price for a customer for a category |
If you want to provide a discount percent for all items, you may prefer to use the Discount percent field found in A/R Customers. If discounts are not used, per A/R Control information, the Discount percent field is not available.
Contract prices that are no longer in effect may be cleared using this selection, or using the Purge contract prices selection on the Utility menu. Refer to Purging Contract Prices.
Warehouse-specific contract prices cannot be defined.
Select
Contract prices from the Prices menu.

The list box displays up to 6 items at a time. You may sort the items by item number, item name, category, and vendor number all in ascending or descending order. Only column names in red may be sorted. To change the sort direction or field either click on the column name or the arrow to the right of the column name or use the View menu options.
To locate an item, start typing a number or name, depending on which sort field is selected. You may also use the up/down arrows, Page up, Page down, Home and End keys to locate an item.
Contract prices can be entered by selecting the New button. An existing price, selected in the list box, can be changed by clicking on the Edit button. It can also be removed by selecting the Delete button. After entering a sales price or editing an existing sales price select either the Save, Save/New, Cancel and Exit buttons as appropriate.
Select Item to enter a contract price for a specific item, or select Category to enter a contract price for a category or sub-category of items. In character select I or C.
If you enter Item, and did not select to use this type of contract price in Control information, a message displays to inform you that contract prices by item are not active.
Contract prices may be entered by item, by category, or by sub-category, regardless of the types selected in Control information. However, these contract prices will not be used in A/R or Order Entry until they are also selected in Control information.
Select a Contract type of Item to display the following entry fields:
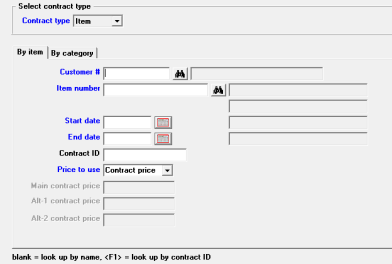
Character Mode
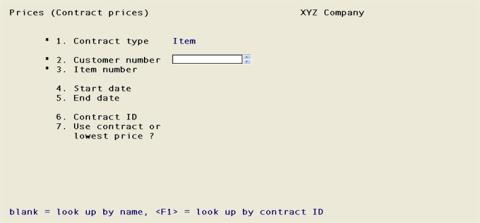
Enter the information as follows:
Enter the number of the customer to receive the contract price.
Options
You may also use one of the options:
|
<F1> |
To lookup by Contract ID. Using graphical, select the New button. When on this field, the option becomes available |
|
Blank |
To look up the customer by name |
|
Format |
Up to 12 digits or use the options |
|
Example |
Type: 10 |
After entering the first contract price, you can also press <Enter> for the last customer number entered.
Options
Enter the item number or bar code, or use Blank to look up the item by description.
You may use the lookup, by selecting <F8> or clicking on the lookup button, to select an item. For instructions on using the item lookup see Item Lookup.
|
Format |
Up to 20 digits or use the options |
|
Example |
Type: 1 |
Enter the date that the contract price becomes effective.
Options
You may also use one of the options:
|
<F2> |
For None if there is no specific start date |
|
<Enter> |
After entering the first contract price, to use the last contract start date entered |
|
Format |
MMDDYY |
|
Example |
Press <F2> |
Options
Enter the last date that the contract price will be in effect, or use one of the options:
|
<F2> |
For None if there is no specific end date |
|
<Enter> |
After entering the first contract price, to use the last contract end date entered |
|
Format |
MMDDYY |
|
Example |
Press <F2> |
Options
Enter the identification information for this contract, or press <Enter> for subsequent contract prices and to use the last contract ID entered.
|
Format |
Up to 15 digits or use the options |
|
Example |
Press <Enter> |
Enter C (Contract price) or L (Lowest price) to indicate whether to always use the contract price or to use the lowest price, if a lower price exists for this item.
|
Format |
Graphical: Drop down list, either Contract price or Lowest price Character: One letter, L or C |
|
Example |
Type C, then press <Enter> |
Enter the price that will be used as the Contract price.
If the stocking unit is something other than EACH that unit of measure displays as part of the field name, example: BOX contract price.
|
Format |
Up to 10 digits |
|
Example |
Type: 25.50 |
This field can only be entered if the item has an alternate 1 price.
Enter the price that will be used as the Contract price.
|
Format |
Up to 10 digits |
|
Example |
Not used in this example. |
This field can only be entered if the item has an alternate 2 price.
Enter the price that will be used as the Contract price.
|
Format |
Up to 10 digits |
|
Example |
Not used in this example. |
If you specify a Contract type of Category, the following entry fields displays:
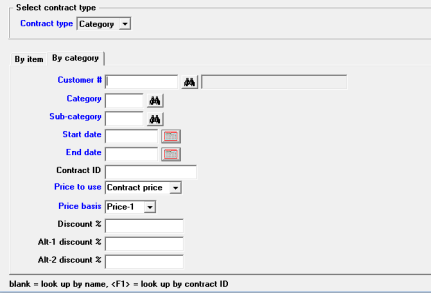
Character Mode
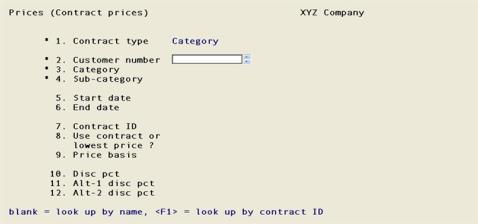
Enter the following information:
Enter the number of the customer to receive the contract price.
Options
You may also use one of the options:
|
<F1> |
To lookup by Contract ID |
|
Blank |
To look up the customer by name |
|
Format |
Up to 12 digits or use the options |
|
Example |
Press <Enter> for customer name |
After entering the first contract price, you may also press <Enter> to use the last customer number entered.
Enter the category of the items to be included in the contract price.
|
Format |
Up to five characters |
|
Example |
Type: Misc |
Enter the sub-category of the items to be included in the contract price, or press <F5> for "All" sub-categories of the category.
An entry of "All" is considered a category contract price because it includes the entire category. An entry of a specific sub-category is considered a sub-category contract price.
If you enter a category of "All", and did not select to use contract prices by category (in Control information), a message displays to inform you that category contract prices are not active.
If you enter a specific sub-category, and did not select to use contract prices by sub-category (in Control information), a message displays to inform you that sub-category contract prices are not active.
|
Format |
MMDDYY |
|
Example |
Press <F5> |
Options
Enter the date that the contract price becomes effective, or use one of the options:
|
<F2> |
For None if there is no specific end date. |
|
<Enter> |
After entering the first contract price, to use the last contract end date entered. |
Enter the last date that the contract price will be in effect.
Options
You may also use one of the options:
|
<F2> |
For None if there is no specific end date |
|
<Enter> |
After entering the first contract price, for the last contract end date entered |
|
Format |
MMDDYY |
|
Example |
Press <F2> |
Enter the identification information for this contract, or press <Enter> for subsequent contract prices and to use the last contract ID entered.
|
Format |
Up to 15 characters or use the option |
|
Example |
Type: 12345 |
Enter C (Contract price) or L (Lowest price) to indicate whether to always use the contract price or to use the lowest price, if a lower price exists for this item.
|
Format |
Graphical: Drop down list, either Contract price or Lowest price Character: One letter, C or L |
|
Example |
Type C, then press <Enter> |
Specify the price to be used as a base for discounting. Enter one of the following:
|
Character |
Graphical |
|
1 |
Price-1 |
|
2 |
Price-2 |
|
3 |
Price-3 |
|
4 |
Price-4 |
|
5 |
Price-5 |
After entering the first contract price, you may also press <Enter> to use the last price basis entered.
|
Format |
Graphical: List box options from above Character: One digit from above (1,2, or 3) |
|
Example |
Press 1 |
Enter the percentage by which to discount the price specified for Price basis when an item is sold by its stocking unit, or press <Enter> to indicate that the stocking unit price is not on contract.
|
Format |
Up to five digits or use the options |
|
Example |
Press <Enter> |
Enter the percentage by which to discount the price specified for Price basis when an item is sold by its first alternate unit. You may also press <Enter> to indicate that the first alternate unit price is not on contract.
|
Format |
Up to five digits or use the options |
|
Example |
Press <Enter> |
Enter the percentage by which to discount the price specified for Price basis when an item is sold by its second alternate unit. You may also press <Enter> to indicate that the second alternate unit price is not on contract.
|
Format |
Up to five digits or use the options |
|
Example |
Type: 22.50 |
Use this selection to change existing prices for a group of items.
You may change prices by a range of items. You may also select a vendor, category, sub-category or all for each. Prices may be changed by a dollar amount or percentage. Three rounding methods are available., including price points for help with marketing and maximizing profits.
This selection provides the printing of a report to first verify the prices. Once the prices are verified as correct, you may select to change the prices, which prints the report as well.
Select
Group price changes from the Prices menu.
If you are using multi-warehouse pricing (as specified in Control information), you are asked if you wish to change group prices by warehouse. Here is the screen:
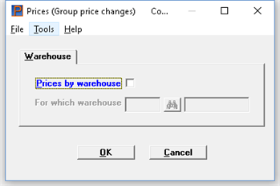
Check this box if you want to enter prices by warehouse. Otherwise leave it unchecked to enter prices for every warehouse.
If you checked the Prices by warehouse field enter the warehouse for which you are entering prices. This field defaults to the central warehouse (blank).
Select OK to continue or Cancel to return to the menu without entering any prices.
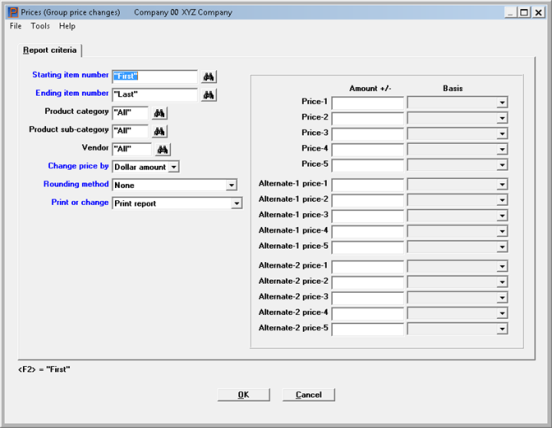
|
Note |
If you selected to change group prices by warehouse, the warehouse you specified is shown at the top of this screen. |
Character Mode
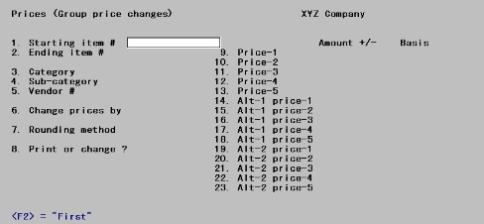
Enter the information as follows:
Ending item number
Enter the range of item numbers for which prices are to be changed or press <F2> for "First" and "Last". Follow the screen instructions.
To select an item you may use the lookup by selecting <F8> or clicking on the lookup button. For instructions on using the item lookup see Item Lookup.
|
Format |
Up to 15 characters or use the option |
|
Example |
Press <F2> at both fields |
Enter the category of the items for which prices are to be changed, or press <F5> for "All" categories.
|
Format |
Up to five characters or use the options |
|
Example |
Press <F5> for "All" categories |
Enter the sub-category of the items for which prices are to be changed or press <F5> for "All" subcategories.
|
Format |
Up to five characters or use the options |
|
Example |
Press <F5> for "All" sub-categories |
Enter the vendor number to change item prices for a single vendor, or press <F5> for "All" vendors.
|
Example |
Press <F5> for "All" vendors |
Prices can be changed by adding or subtracting a dollar amount to a base figure, or by computing a percentage of a base figure and adding or subtracting the result to the base figure.
Enter D (Dollar amount) to change prices by a dollar amount, or P (Percent) to change prices by a percentage.
The base figure can be any of an item's current prices or its replacement cost. For prices other than Price-1, the base figure can also be any of the item's new prices. You can specify a different base for each price to be changed.
|
Format |
Graphical Drop down list with the choices of Percent or Dollar amount Character: One letter, D or P |
|
Example |
Type: D |
Specify the method to be used for rounding the newly calculated prices. Enter one of the following:
|
Character |
Graphical |
Description |
|
C |
Round to nearest cent |
To round the prices to the nearest cent |
|
P |
Round to the nearest point |
To round the prices to the nearest price point |
|
I |
Increase to next price point |
To increase the prices to the next price point |
|
N |
None |
To not round, increase or decrease the prices |
If you select Round to nearest cent (C) the third decimal position of each new price is rounded up or down to the nearest cent. A value of 5 or greater is rounded up, and 4 or less is rounded down.
If you selected either Round to the nearest point (P) or Increase to next price point (I), after hitting the Tab or Enter key to move to the next field, a window appears for entering price points. Otherwise the focus moves immediately to the Print or change field.
Using graphical, If you exit the price points screen and you need to return to the screen, put the focus on the Rounding method field, select either Round to the nearest point or Increase to next price point and hit the Tab or Enter key.
This is the price point window:
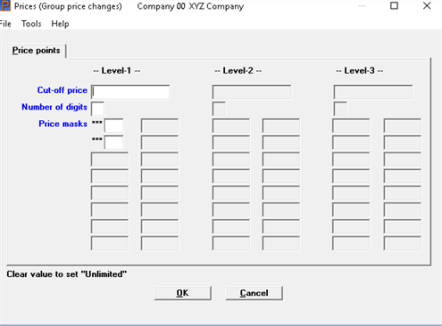
Character Mode
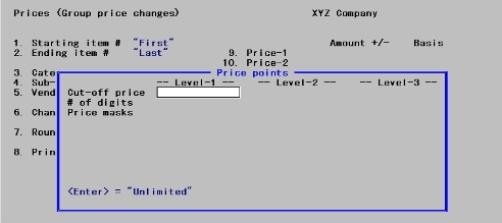
A price point is a particular price at which merchandise is sold.
For example, the price points in your store might be $0.79, $1.79, $2.79.
By selecting a rounding method of Round to the nearest point (P) or Increase to next price point (I), you can ensure that each calculated price coincides with one of your price points.
In our example ($0.79, $1.79, $2.79), a two-digit price mask of 79 defines the price points. In other words, no matter what price was calculated, the last two digits of that price are masked with 79.
Price Levels
Some businesses require multiple price masks, or even different price masks for different price levels of goods. Price points allows you to define up to three distinct price levels and up to sixteen price masks within each level.
For example, your low-price goods are under $3.00 and you price them at $0.79, $1.79, and $2.79. Your moderate goods are more than $3.00 but under $9.00, and you price them at $5.95 or $8.95. The rest of your goods are over $9.00, and you price them in increments of $10.00, at $9.95, $19.95, $29.95 and so forth.
You would define your price points as follows:
|
|
Level-1 |
Level-2 |
Level-3 |
|
Cut-off price |
3.00 |
9.00 |
Unlimited |
|
# of digits |
2 |
3 |
3 |
|
Price masks |
***.79 |
**5.95 |
**9.95 |
|
|
***1.79 |
**8.95 |
**19.95 |
|
|
***2.79 |
|
**29.95 |
Price changes are calculated in the normal manner. Then, if you selected Increase to next price point (I) as the rounding method, the price is rounded to the next higher price point. If you selected Round to the nearest point (P), the price is rounded to the closest lower or higher price point.
Enter the cut-off price.
Your entry for the Level-2 Cut-off price must be higher than the Cut-off price for Level-1, and Level-3 must be higher than Level-2. Press <Enter> for Unlimited when entering the cut-off price for the last level to be defined.
|
Format |
9,999,999.99999 |
Your entry for # of digits to be entered for the price masks must be between 1 and 5, and cannot be greater than the number of digits entered for the value of Cut-off price.
For Price masks, up to 16 masks may be entered for each level and the masks within each level must be ascending. Press <Enter> when completed entering the masks in a level. If you specified 3 or more for Number of digits, you must enter a decimal point in the appropriate position of each mask.
Replace default price points?
After defining price points, you may save them as default entries for use the next time t Group price changes is selected.
Select OK to continue or Cancel to return to the previous screen without saving the price points.
Using graphical, If you exit the price points screen and you need to return to the screen, put the focus on the Rounding method field, select either Round to the nearest point or Increase to next price point and hit the Tab or Enter key.
Enter one of the following:
|
Character |
Graphical |
Description |
|
P |
Print report |
To only print a report showing all items for which prices would be changed, along with the old and new prices that would be changed. The prices are not actually changed. |
|
C |
Print report and change prices |
To print the report and change the prices. |
|
<Enter> |
N/A |
To indicate No change |
If you selected to change by dollar amount, for each price shown, enter the amount to be added to or subtracted from the base figure to calculate the new price. To subtract the amount, include a minus sign.
For example, an entry of 2.50 establishes a new item price of the specified base, plus $2.50. An entry of 2.50- establishes a price of the specified base, less $2.50.
If you selected to change by percentage, enter the percentage of the base by which to change the price. To use a price less than the base figure, include a minus sign.
For example, an entry of 10 establishes an item price of the specified base, plus 10%. An entry of 10- establishes a price of the specified base, less 10%.
Using character mode only, for both dollar amount and percentage changes, you may also press <Enter> to indicate No change at any price.
|
Format |
Dollar amount: 9,999,999.99999 Percent change: 9999.999 |
For each price being changed, enter the base to use.
Select Old price (O) to use one of the item's old prices, or select Replacement cost (R) to use the item's replacement cost. For prices other than Price-1, you may also enter New price (N) to use one of the item's new prices as the base.
An Old price is a price for the item prior to the change you are making now. The Replacement cost is the cost of the item at the last purchase. A New price is a price for the item that will be created by a change you have already made on this screen.
If you enter a basis of either Old price (O) or New price (N), a window displays for you to select which old or new price you wish to use.
On the price 1 field, select one of the options from the list box, as seen here:
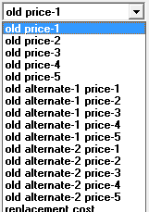
On the fields other than Price 1, the Basis field also has the options of new price 1, 2 3 4, 5, new alternate 1 price-1, 2, 3, 4, 5 and new alternate 2 price-1, 2, 3, 4, 5. As you progress down the list of prices the previous field just entered becomes available as an option.
Notice that the old price options are included with the replacement cost.
Character Mode
Using character select the old or new price to be used by using the arrow keys (or typing the first letter) to position the cursor and press <Enter>. After selecting old price the following options display.
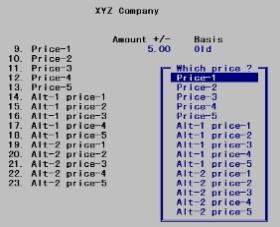
|
Note |
For new prices, only those prices already specified on this screen are shown in the window. |
If you specified to print the report without changing prices, you can display the report to the screen or send it to a printer. The display option is not available if you are also changing prices.
If Price-1 was changed for any item, the change in retail value of the reported items is shown at the end of the report. The retail value is computed based on the current on-hand quantity of the item and Price-1.
If any errors occur when attempting to change prices for an item, no prices are changed.
Select OK to continue or Cancel to return to the menu without printing or changing any prices. If you are using multi-warehousing, after selecting Cancel the focus returns to the warehouse selection window.
Use this selection to purge sale prices that have expired.
Select
Purge sale prices from the Utility menu.
The following screen displays:
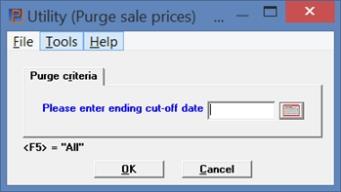
Character Mode
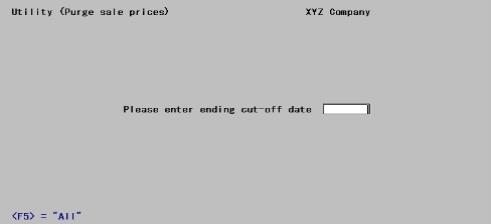
Please enter ending cut-off date
You are asked to enter an ending cut-off date. Enter the last date for which sale prices are to be purged, or press <F5> to purge all sale prices regardless of ending date.
Select OK to purge sales prices or Cancel to not purge and return to the menu.
No report is printed. If it a purge verification is required, print the Price list before and after the purge and do a comparison. See Price Lists.
Use this selection to purge contract prices that are no longer in effect.
Select
Purge Contract prices from the Utility menu.
The following screen displays:
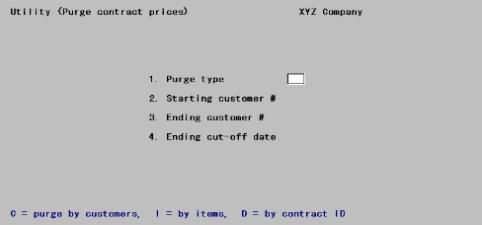
Enter the type that you want to purge from the following:
|
Charactetr |
Graphical |
Description |
|
C |
by customers |
To purge by customers |
|
I |
by items |
To purge by item |
|
D |
by contract ID |
For contract ID |
|
Example |
Graphical: Select by customers Character: Type: C |
Ending item #
Enter the range of items to be purged or use one of the options:
|
<F2> |
On both fields, to select the "First" to "Last" item numbers |
|
<F8> |
To look up the item from a list of items |
|
Format |
Up to 15 digits or use one of the options |
|
Example |
Press <F2> at each field to select all items |
Ending customer #
Enter the range of customers for whom contract prices are to be purged or use one of the options:.
|
<F2> |
On both fields, to select the "First" to "Last" customer numbers |
|
<F8> |
To look up the customer from a list of customers |
|
Format |
Up to 12 digits or use one of the options |
|
Example |
Press <F2> at each field to select all customers |
Ending contract ID
Enter the range of contract IDs to be purged or use one of the options:.
|
<F2> |
On both fields, to select the "First" to "Last" contract IDs |
|
Format |
Up to 15 digits or use the option |
|
Example |
Press <F2> at each field to select all contract IDs |
Enter the last date for which contract prices are to be purged, or press <F5> to purge all contract prices regardless of ending date, including those entered with "None".
Contract prices with an End date on or before the cut-off date for the specified customer range will be purged.
|
Format |
MMDDYY or use the option |
|
Example |
Press <F5> to select "All" |
Select OK to purge contract prices or Cancel to return to the menu without purging.
No report is printed. If it a purge verification is required, print the Price list before and after the purge and do a comparison. See Price Lists.